3 Examples How to Use Revit Key Schedules
What is a schedule?
A schedule is a format to that easily allows users to centrally locate keyed data with identified subjects. E.g., room, door, or occupancy egress schedule. Schedules are important for quick and efficient documentation in a project. Schedules used to be static and required continuous rechecking to ensure they were up to date with the latest revised drawing. However, once objects became smart and could hold groups of data that could link to dynamic schedules. This allowed for easier and automatic syncing without needing to manually check everything.
Even though data is auto generated, an improperly set up schedule will cause users to manually update repeatable information. This creates waterfall changes that can eat up valuable time again and again. A quality set of drawings groups and centralizes as much information as possible to allow for fast and efficient updates across multiple different documentation areas.
See our previous article about creating effective cost schedules.
What is a key schedule?
Effectively, a key schedule is a “sub-schedule” that is linked into the main schedule through a key parameter. This allows users to partition off repeatable chunks of data associated with an object for faster dissemination of information. For example, instead of manually inputting the same door hardware information for multiple doors, a key schedule will hold information for all door hardware combinations (closer, handle, door plate, lockset, etc.) with a key parameter that is used in the primary door schedule.
How to use key schedules effectively
Key schedules are best used in two scenarios, by either partitioning off grouped data to a separate schedule with a parameter tag (e.g., door hardware or finish legend) or as a central repository for auto populating information into main schedules (e.g., room occupancy SF or room surface finishes). Setting up this information in project templates will easily speed up the process for assigning standard information such as room names, occupancy loads, typical finishes, etc.
Partitioned key schedule
Construction drawing can quickly become overwhelming if the user does not have a system in place for organizing and structuring drawing information. (Check out our blog about cleaning up drawing notes!) Using a key schedule will help with grouping similar information that does not need to be repeated. (e.g., door hardware schedules)
Populate primary schedules with key schedules
If a designer wanted to add surface finishes to a room schedule, they could update that information manually for each room. Inevitably, there will be projects with dozens or hundreds of rooms, most with the same finishes. To save time, a user could create a key schedule with the assigned finishes and link the key parameter to each room tag and the primary schedule will auto populate the surface finish information across all similarly assigned rooms. Then, if the finish selection changes, only the key schedule needs to be revised for all rooms to be updated. Smarter, not harder.
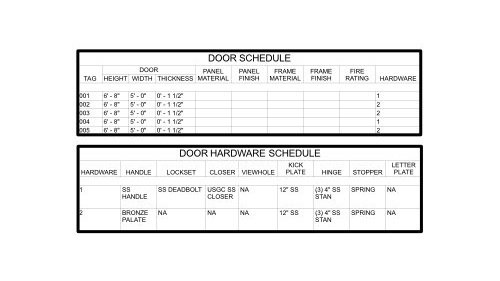
Example 1 - Door hardware schedule
For this schedule, we will use the key schedule to group door hardware separate from the primary door schedule.
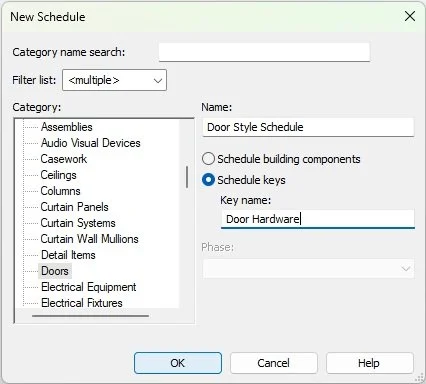
Go to View > Create > Schedules > Schedules/Quantities
Inside the New Schedule window, select Schedule Keys and under “Key Name” field add Door Hardware. (The “Name” field is the name of the schedule, in the project browser, while the “Key Name” is the actual name of the parameter to link in the primary schedule.)
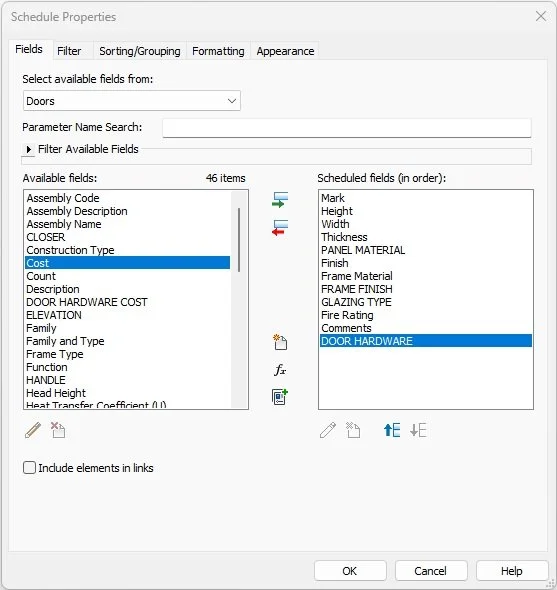
Inside the scheduled properties create any number of hardware category parameters to cover the hardware specifications for each door hardware type. See our example below.
To add multiple keys inside the schedule window:
Modify Schedule > Rows > Inset Data Row

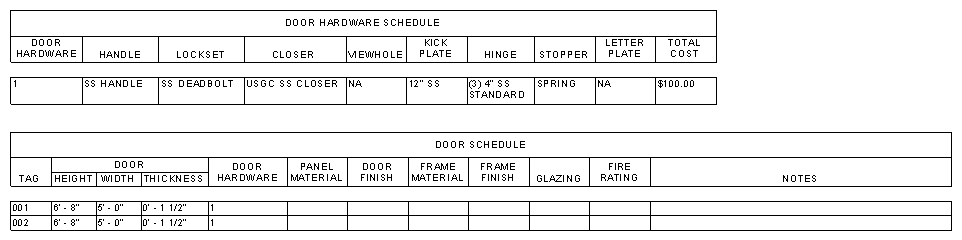
Now that the hardware schedule is set, we can add the “Door Hardware” parameter to the Door Schedule inside the Schedule Properties window.
Once the “Door Hardware” parameter is added, assign the parameter key to each door. The drop down field will only populate with the number and name of keys available in the door hardware key schedule.

Finally, add both the door and hardware schedule to the sheets for quick reference.
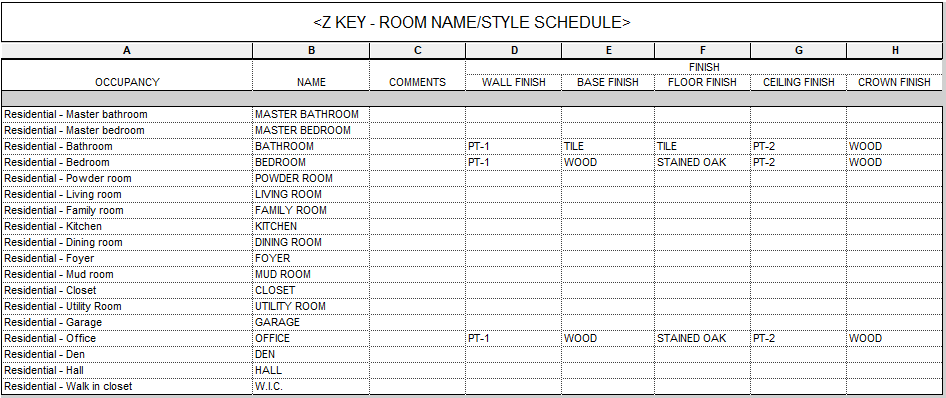
Example 2 - Room finish schedule
For this schedule, we will use the key schedule to automatically fill out the room names and finishes in the primary room schedule.
Create a new room name/finish schedule:
View > Create > Schedules > Schedules/Quantities
Under “Key Name” write out Room Type.

Once inside the key schedule, create as many categories as necessary to cover room finishes, we used: wall, floor, ceiling, base, and crown finishes.
Next, using the Insert Data Row tool, add as many room types as desired and fill out the finish categories.
Now create the primary room schedule making sure to add the Room Type parameter and the finish surface parameters set up in the key schedule.
After placing rooms on the floor plans, go into the schedule as assign the Room Type parameter to each room. This will assign the standardized room name and surface finishes set up in the key schedule.

Once set up, if a finish needs to be updated, simply revise the key schedule and all assigned rooms will automatically update.

Example 3 - Occupant load room schedule
In this example, we will assign a preset occupant load square footage using a key schedule and calculating egress requirements for rooms.
Inside the same room key schedule create an Occupant Load Factor parameter and populate the information with code compliant square footages.

Once rooms are assigned with the Room Type parameter, we can generate a new Room Occupancy Schedule.
Inside the Schedule Properties window, add a calculated parameter for Occupancy Load, Stair Egress Width, and Door Egress Width with the formulas below. (Make sure to review the local municipal code for exact calculations.)

Nothing too complicated here. These are simply arithmetic operators using parameters.


Once set up, this schedule will automatically update if the program changes with new rooms or relabeled rooms for the latest code review.


Streamline your design process with the Ultimate Revit Template, designed to leverage the full potential of BIM workflows for optimal project production and analysis. This comprehensive template features integrated code review workflows for key deliverables, enhanced view template filters for automated graphics, and advanced analytical tags to keep your projects on track. Benefit from detailed analysis schedules that provide precise requirements and identify major conflicts at every stage of project development.
BIM firms charge thousands for this level of development and integration; our template offers these powerful features at a fraction of the cost! We've embedded structures and automation to help reduce manual updates and avoid repetitive troubleshooting, allowing you to focus on bringing your projects to life efficiently. Experience a new level of productivity with the Ultimate Revit Template.

Enhance your design process with our Premium Revit Template, designed to optimize your Revit workflows. Eliminate repetitive tasks and embrace easier documentation. This versatile project template helps optimize drawing production by significantly reducing the time spent on updates and troubleshooting across multiple projects.
BIM firms charge thousands of dollars for this level of development and integration, but our template is available at a fraction of the cost! Experience the benefits of BIM automation, allowing you to focus on creativity while minimizing the friction between start and final product. Increase productivity, reduce waste, and elevate your projects to new heights with the Premium Revit Template.