Simple graphic automation using Dynamo
Its been a while since we last posted to our insights section of our website. This is because we have been hard at work creating new collections and improving existing ones. We want to come back and post more informative articles and videos for everyone. The only things that might change about our articles is that we will try and integrate videos into the subject we are talking about.
BIM Template Youtube channel
If you did not know, we have a Youtube channel where we discuss features and workflows for our products. For the users who do not like to read our user guides and instead can work along side videos to understand the workflows we have setup to better take advantage of our collection. If you have not already done so, subscribe! It helps out our business reach more audiences and we will be putting our more videos regularly.
We began a new series on our Youtube channel we dubbed our Dev videos. This is a series that will be more off-the-cuff with few edits unlike our feature videos. This will give users a behind-the-scenes look at what we are working on, challenges, and workflows we establish to support development. They will be a longer format but we think they are filled with subjects I typically have only found buried in old Revit forums.
We are also going to put out regular videos discussing different Revit workflows and discussions on Revit tools. We do not want to commit to a specific schedule right now but we plan to put out videos every one to two weeks.
Dynamo: the powerhouse Revit tool
Now onto the main subject! We put out a video last week, the second in our dev video series, walking through the creation of a simple Dynamo script that will automate the duplication, setting graphics, and associating parameters to detail lines.
This video was born out of a need to automate a repetitive task that took, at max, 1 minute to perform. However, this task had to be performed at least 70 times. Which can take roughly 70 minutes on its own but its not a straight 70 minutes. The task is spliced in between multiple tasks for each family that needed to be updated and sometimes there is human error remembering to do the task or errors in clicking the wrong button. Let alone verifying if the task was done correctly. We have worked through this type of task workflow before but creating a script that guarantees a completed task is much better solution for the overall workflow and mental load.
The main take away when discussing Dynamo workflows for Revit is that Dynamo does what Revit can’t. That simply means, users can have an infinite number of specific workflows that Autodesk simply does not want to program. The alternative? Create a sandbox with a simple graphical interface for users to create their own workflow specific tools! Need to renumber 50 doors and coordinate those with room numbers? DYNAMO CAN DO THAT! (Now in 2027 there is a renumbering tool to expedite this process but this is one of many examples for how Dynamo can help in your day to day.)
Outlining the Dynamo script task
Before we create a script we need to outline what we are trying to accomplish. For this script we want to:
Selecting specific detail lines.
Duplicate selected lines twice.
Assign the proper object styles category to the lines to coordinate line weights.
Associate the visibility for each group of lines to a specific family parameter.
Not a complicated task list but we will use a couple of techniques for proper execution.
We are building this out in 2024 because that is the earliest version we support for our products. There are a few considerations, such as additional package that need to be installed and whether those packages are still updated in later version of Dynamo. (We will do more specific getting started videos on Dynamo in the near future.)
The main package we will use is the Orchid dynamo package. For a couple of the things we want to accomplish this is the only package that supports these workflows.
Step 1: Selecting specific detail lines
We have a collection of lines we have established as 03 Lines. What we want to do is select only those lines for duplication. There are a couple of methods to do this but since the lines will be the same each time we can do a simple collect all and filter approach instead of individually selecting each line.
We collect all detail lines in the family and filter the subcategory parameter to get all 03 Line types.
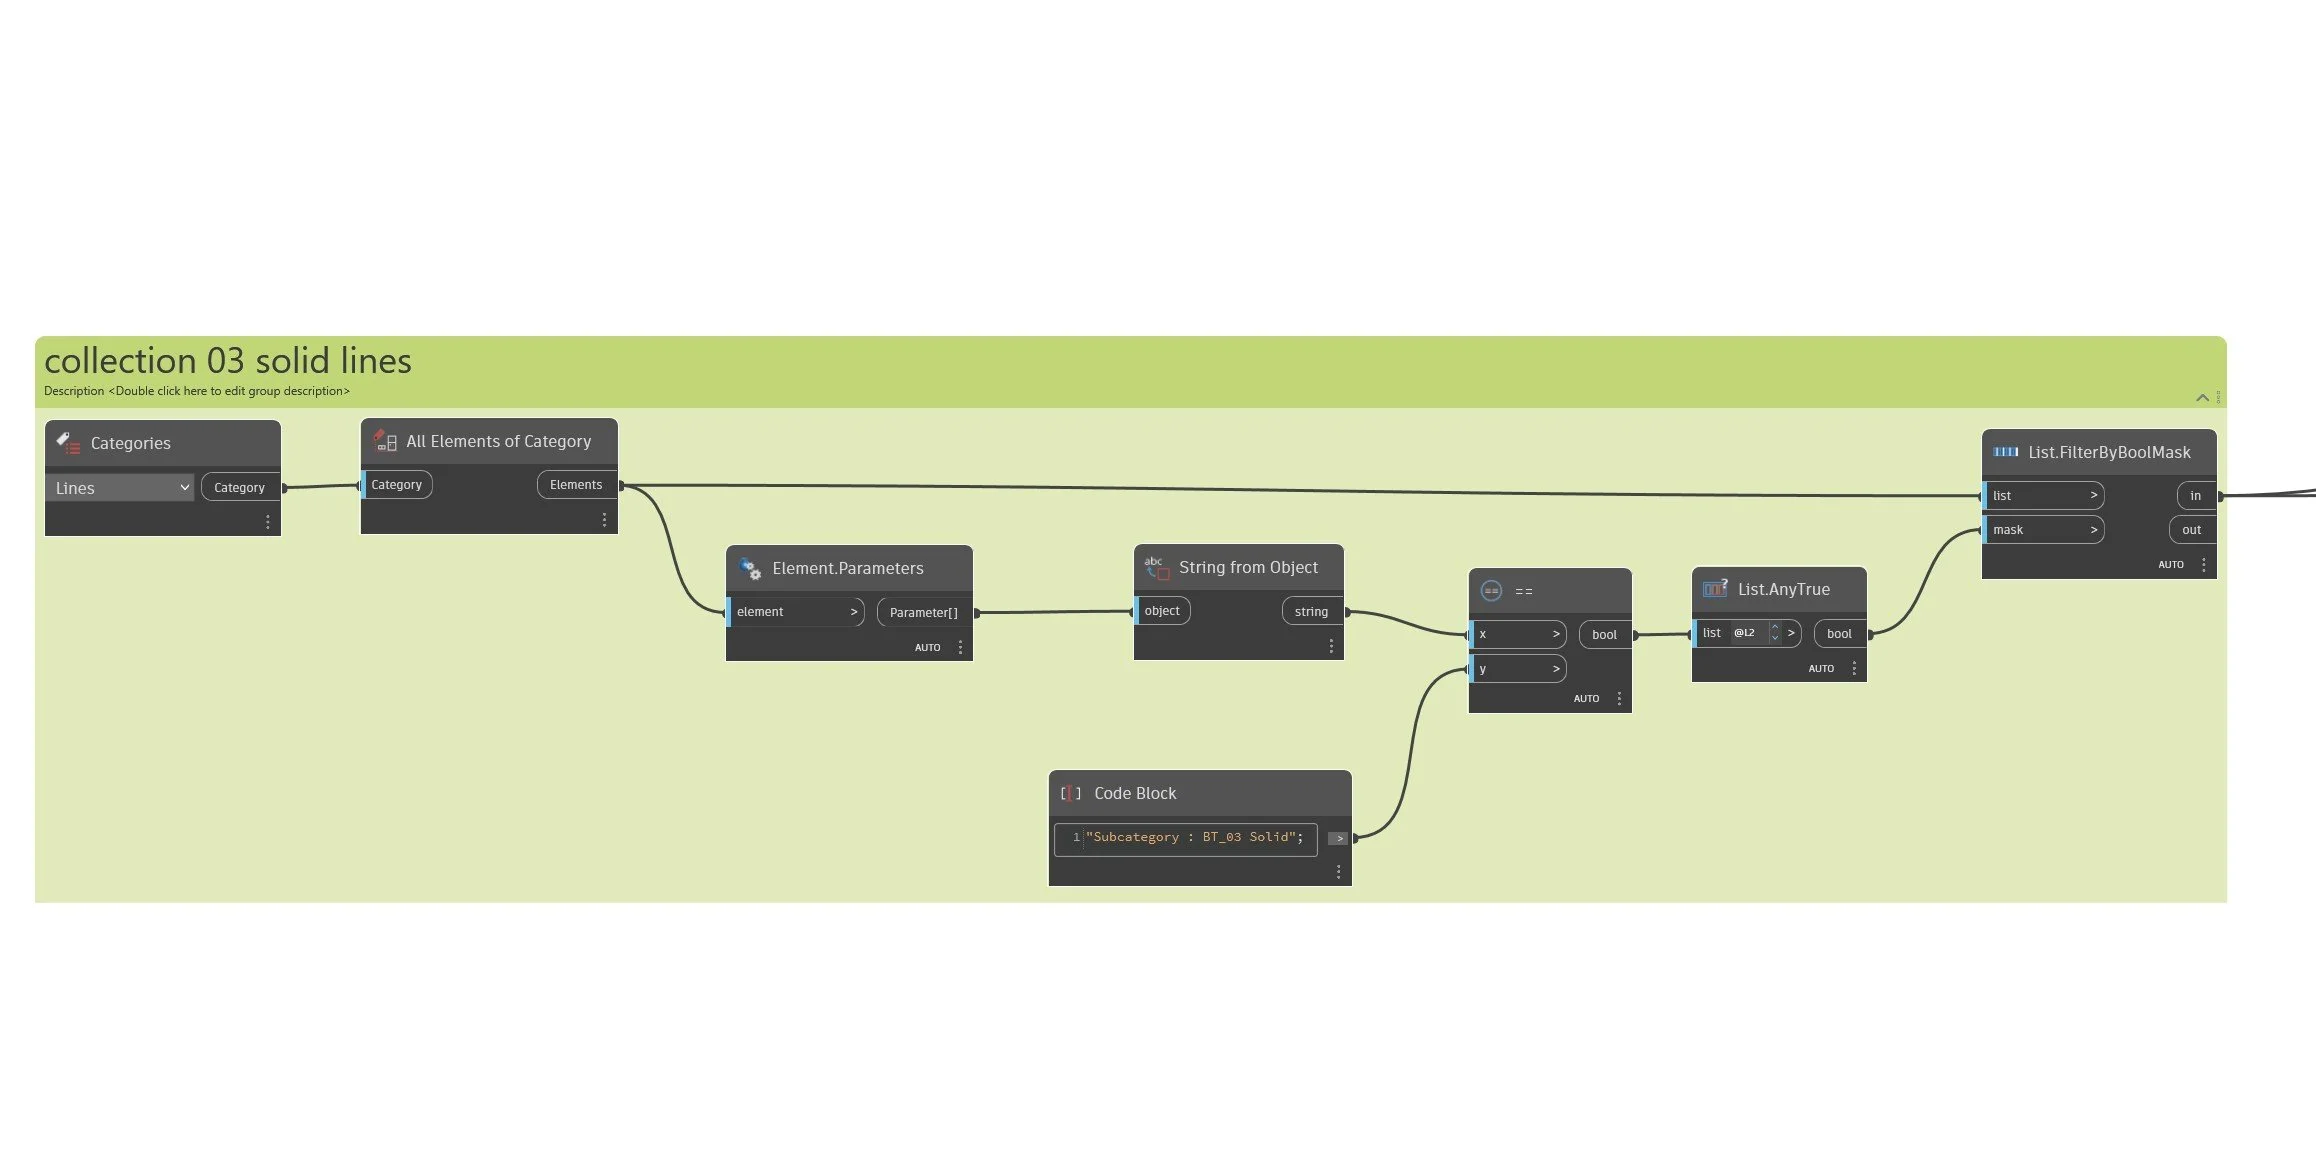
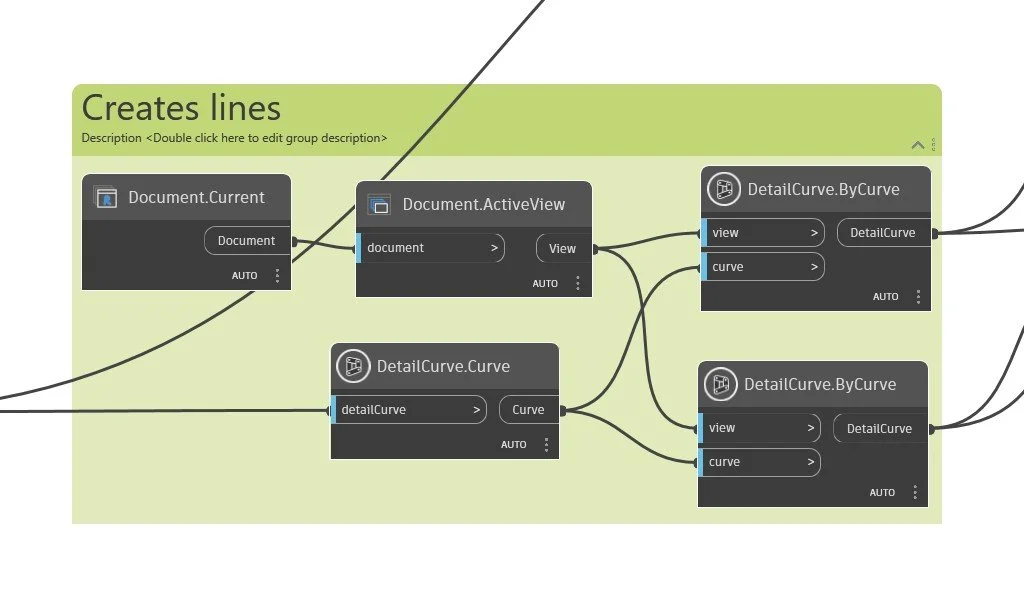
Step 2: Duplicate detail lines, twice!
The next step is to get the curve coordinate information from the detail lines then pass that information into a creation node, along with the active view, to replicate the exact lines. This is a similar method used to replicate dimensions or tags across multiple views in a Revit model.
The creation node does require us to input the active view from the document. For OOTB (out of the box) nodes you typically can use the document.current node. However, some OOTB and packages require users to specifically pass the family document value. This all depends on how the node was programmed. Since Revit’s API treats the project environment different from the family environment (and it sometimes depends on the family).
Step 3: Assign new graphic settings
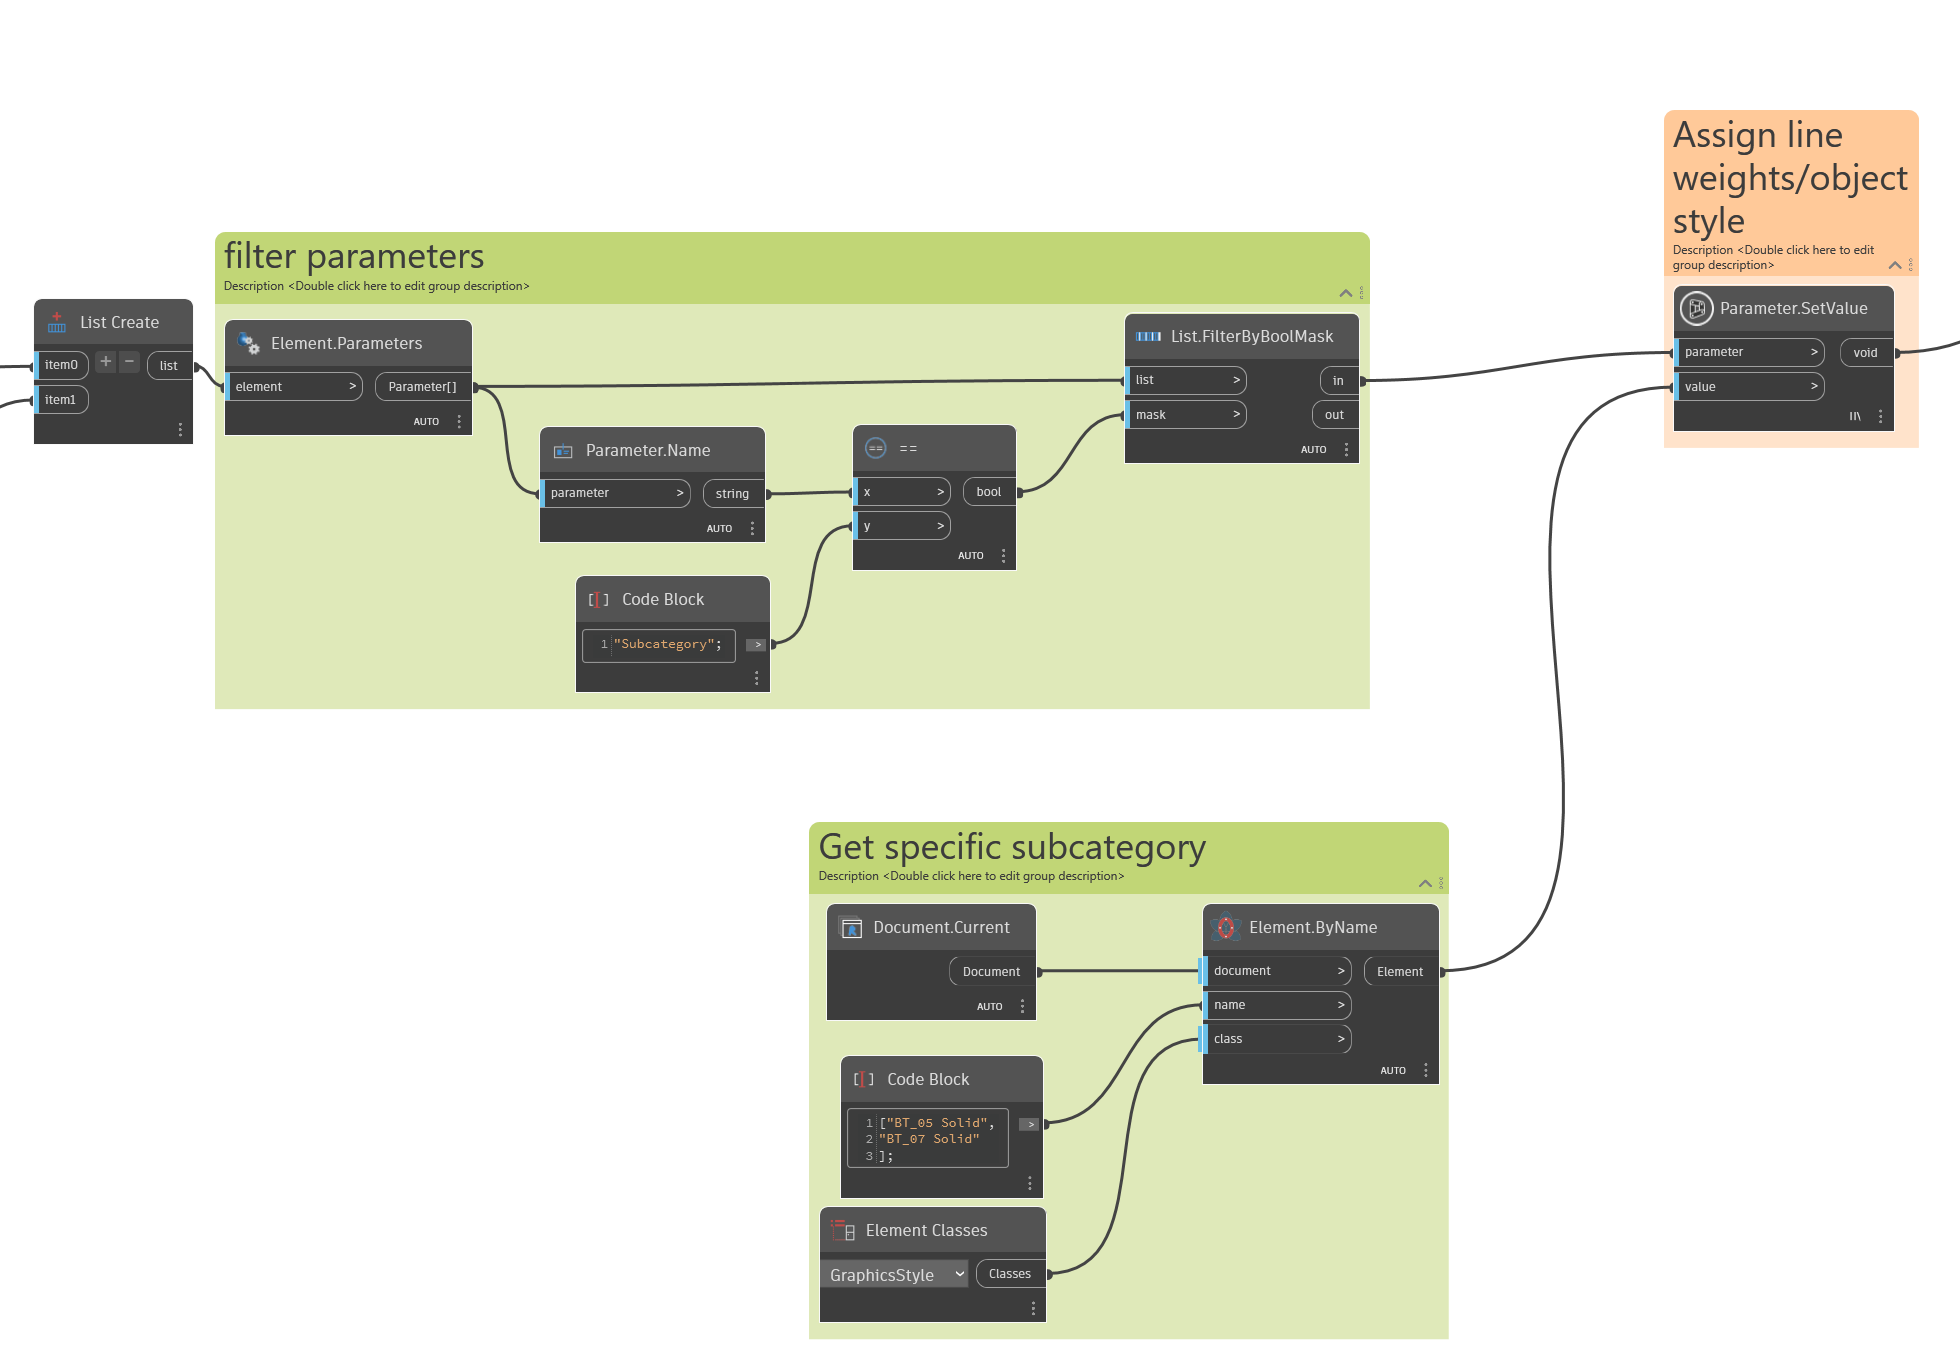
Since we have the correct number of lines in the family, we can remap the graphics! The first step is to create a list of the new lines and get their Subcategory parameter. We also need to collect the needed object style subcategory in the family document. This is where we first use the Orchid package. There are other nodes to get this information but this reduces the number of nodes and filters we have to use my simply writing out the subcategory we need to pass to the new lines.
The main thing to note, in the project environment, if you want to remap graphics to a detail line you want to search for Line Styles, but inside a family environment you need to map object styles. This is information is found under the GraphicStyle class.
Once we have collected the necessary object parameters and graphic settings, we can use the OOTB Parameter.SetValue node to update out lines. Make sure to set the lacing to longest since the lists are uneven and the elements are in a structure list (this is why we did not flatten the list, we want to preserve the grouping).
Step 4: Associate visibility parameter
This is where the Orchid package comes in clutch. We are able to associate the element visible parameter with a specific family parameter using FamilyParameter.Associate. There is no OOTB (that I am aware of) that will do this without creating a Python script.
This section is fairly straightforward. We get the family parameters we want to associate, then we get all detail lines (03, 05, & 07) “Visible” parameter to associate without us having to manually perform this task.
The only additional technique we use in this section is the passthrough parameter. There are a couple of nodes in different packages that perform this task but we like doing it with a Code Block node. This node is use to ensure this code section is not executed until everything else is done. Dynamo scripts do not always execute the exact same way you intend. Even if you have it organized visually, Dynamo will execute the script as it sees fit. If this section of the code processed before other sections, the script will output an error.
The main principle for how this code works is we are creating a list of items that are added to this code block. We are passing through the current document information with the “passthrough” input but it will not flow into the familyparameter.byname node until the information for the “waitfor” input is processed. A simple but effective way to order the process of execution.

Step 5: Nice to have, but not required
The last thing we could do to enhance this script is to adjust the “Reference” setting and set the layered lines as “Not a Reference.” In practice, we like to turn off layered lines from being used in the project environment. This helps keep lines and dimensions from accidentally shifting around and users then have accurate references.
The process is similar to when we set the elements subcategory in step 3.
Is there anything else we should have included to speed up our process or a node you would replace? Let us know what you think!
Upcoming Ultimate Detail Item Collection
We are very excited at the progress and the quantity of the detail item collection we are developing (over 500 so far!). The main goal is to have a detail item collection that has just as many detail items as what comes out of the box with Revit but with:
Actual line weight controls.
Better graphical adjustments.
Unified parameter naming standards.
Synchronized parameter data across objects with multiple views.
Better notation/tagging/keynoting system.
Organized family naming standards and CSI identification.
Plus more goodies for easier customization!
Make sure you are signed up for when we are close to releasing the new collection. (We are shooting for 1.5 to 2 months from now!)

Customers who purchase one of our bundles before we release the new collection will gain instant access to our new detail item collection for free. Once the collection is released, our prices will change to reflect its inclusion. Best to purchase now!