Create automated occupant load schedules and plans in Revit
What are occupant load calculations?
A common documentation requirement for municipal review, for nearly all non-residential projects, is occupancy calculations. Its purpose is to make sure a designed space is compliant with code safety measures. Verifying if a fire happens in a space, there are enough doors, stairs, or corridors for people to exit safely without creating a bottleneck.
Historically, and what I suspect many still do today, this task was performed manually by collecting the areas, set the occupant load factors, and perform the calculation. Either done with a pen and paper or with a text box on a sheet. This process could be sped up using an excel program automating the calculations but this still requires back and forth migration of data between the two programs.
The main drawback for these options is if the plans need to be altered, the calculations need to be redone and cross checked again. This can be a huge time sink during DD and CD phases of a project. However, if we used the built in structures inside of Revit we are able to automate the calculation process and significantly cut down on overhead QC for each iteration of an idea or issued drawings.
In this video we outline the step by step process to set up a basic occupant load diagram.
Different methods to create area calculation plans
First we need to establish where we are sourcing the area numbers. In Revit, there are a couple of methods to capture areas on a plan.
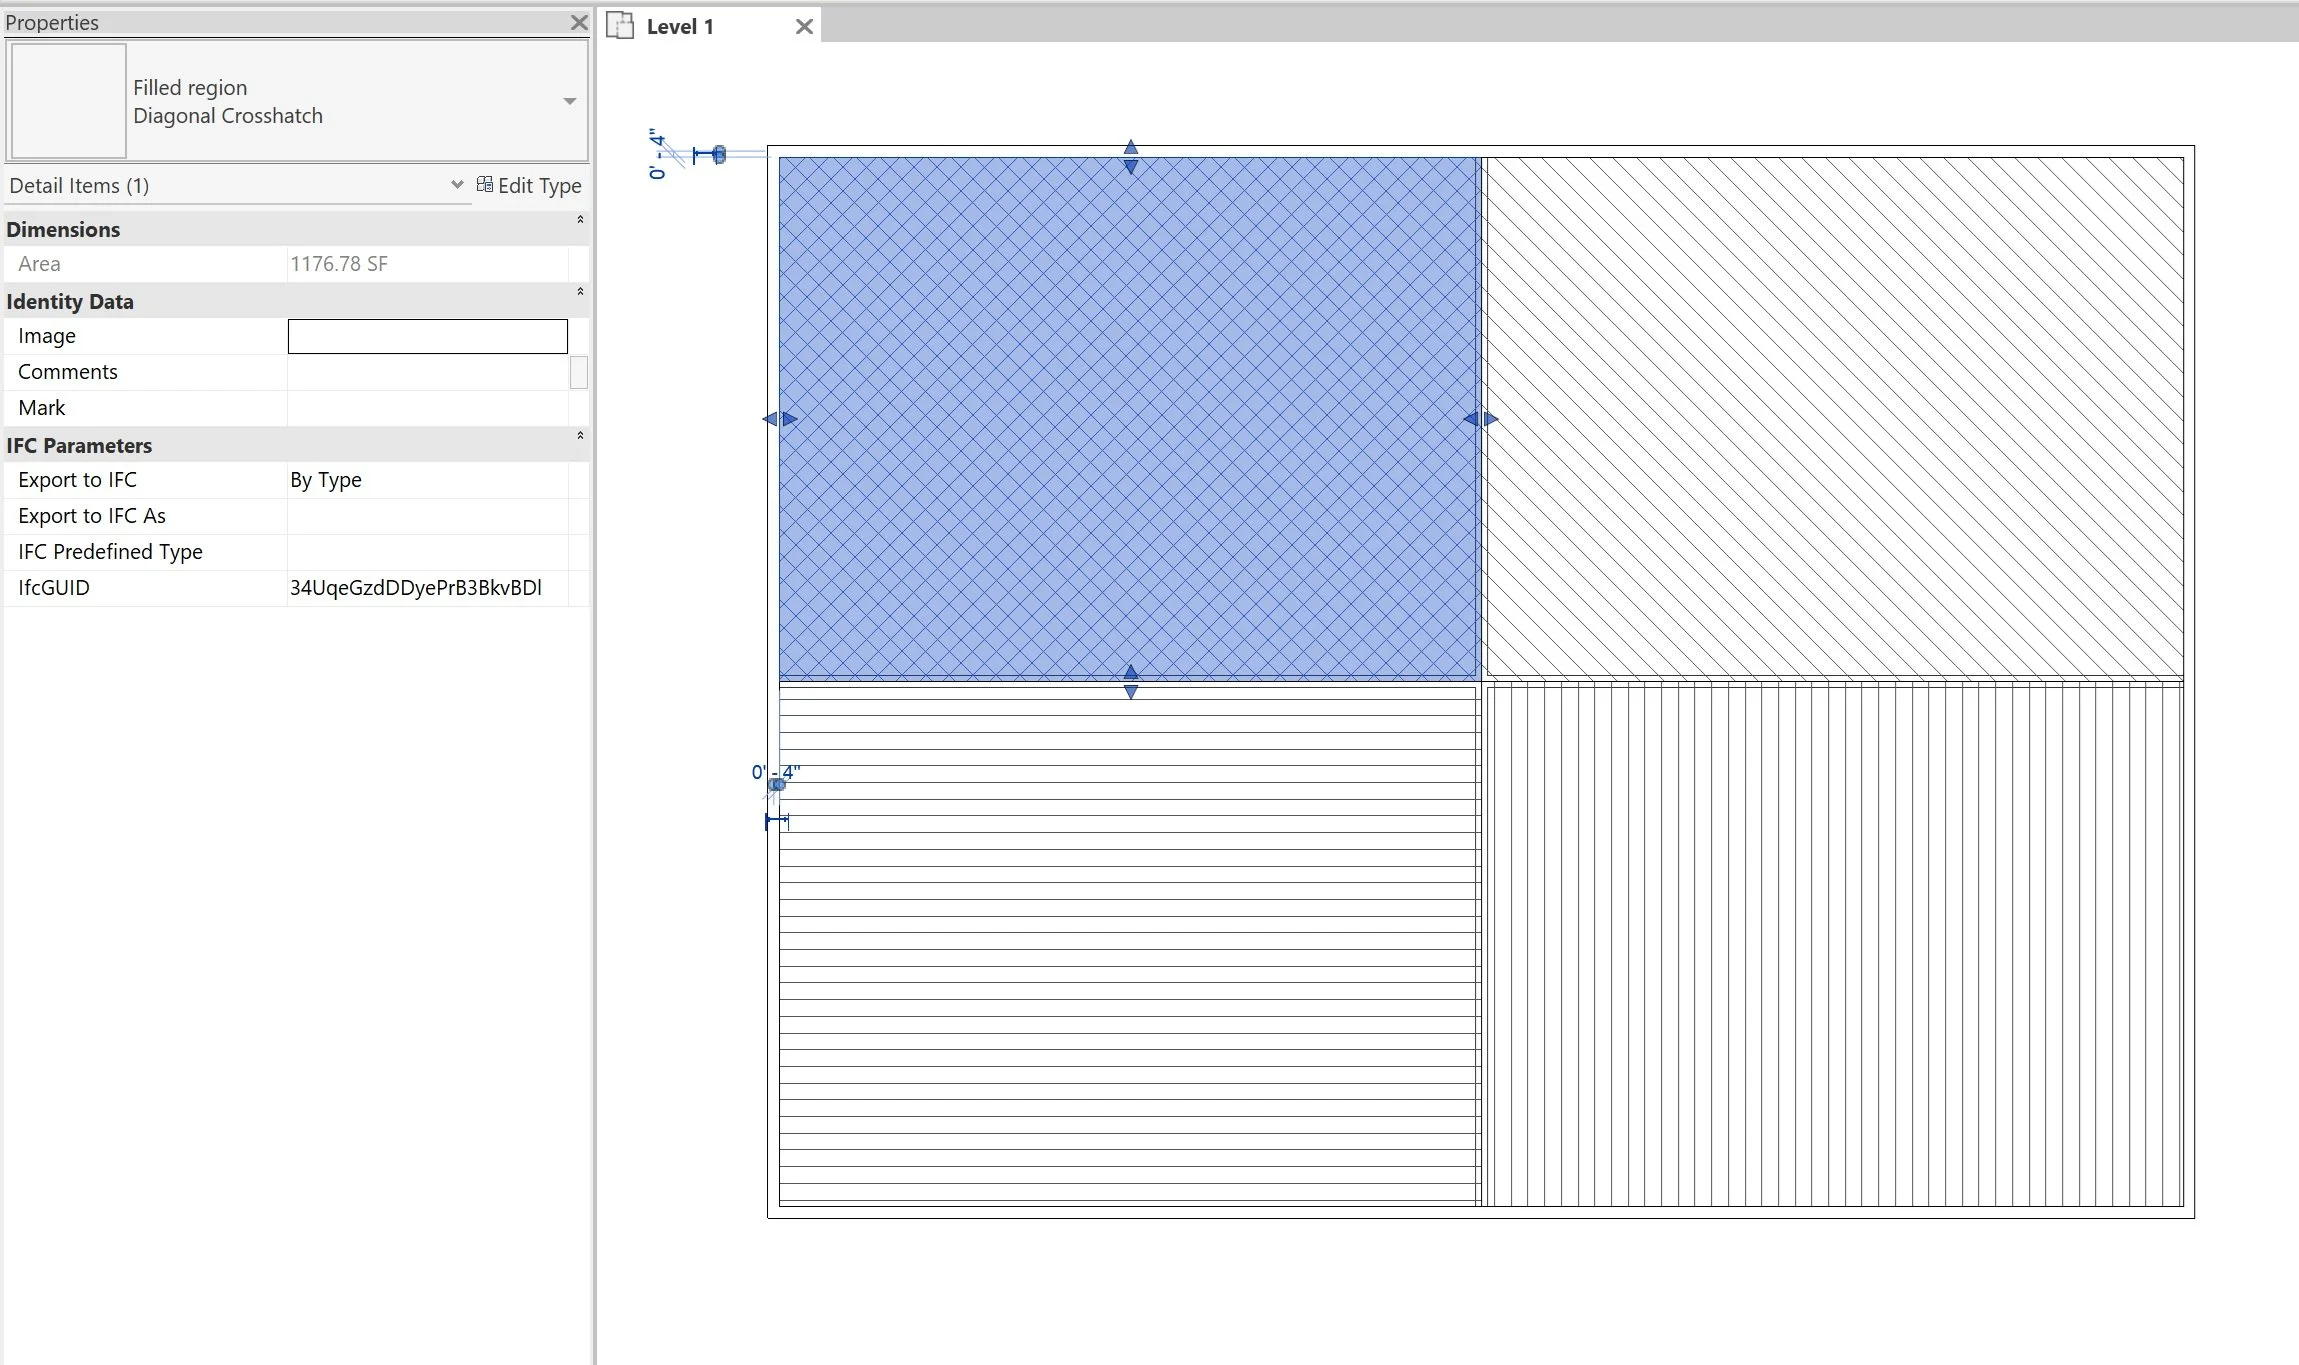
Filled Regions
This is a very manual method because these elements are not adjustable across multiple views, regions are not schedulable, and does not automatically adjust when layouts change. This method further requires other means to calculate and document values.
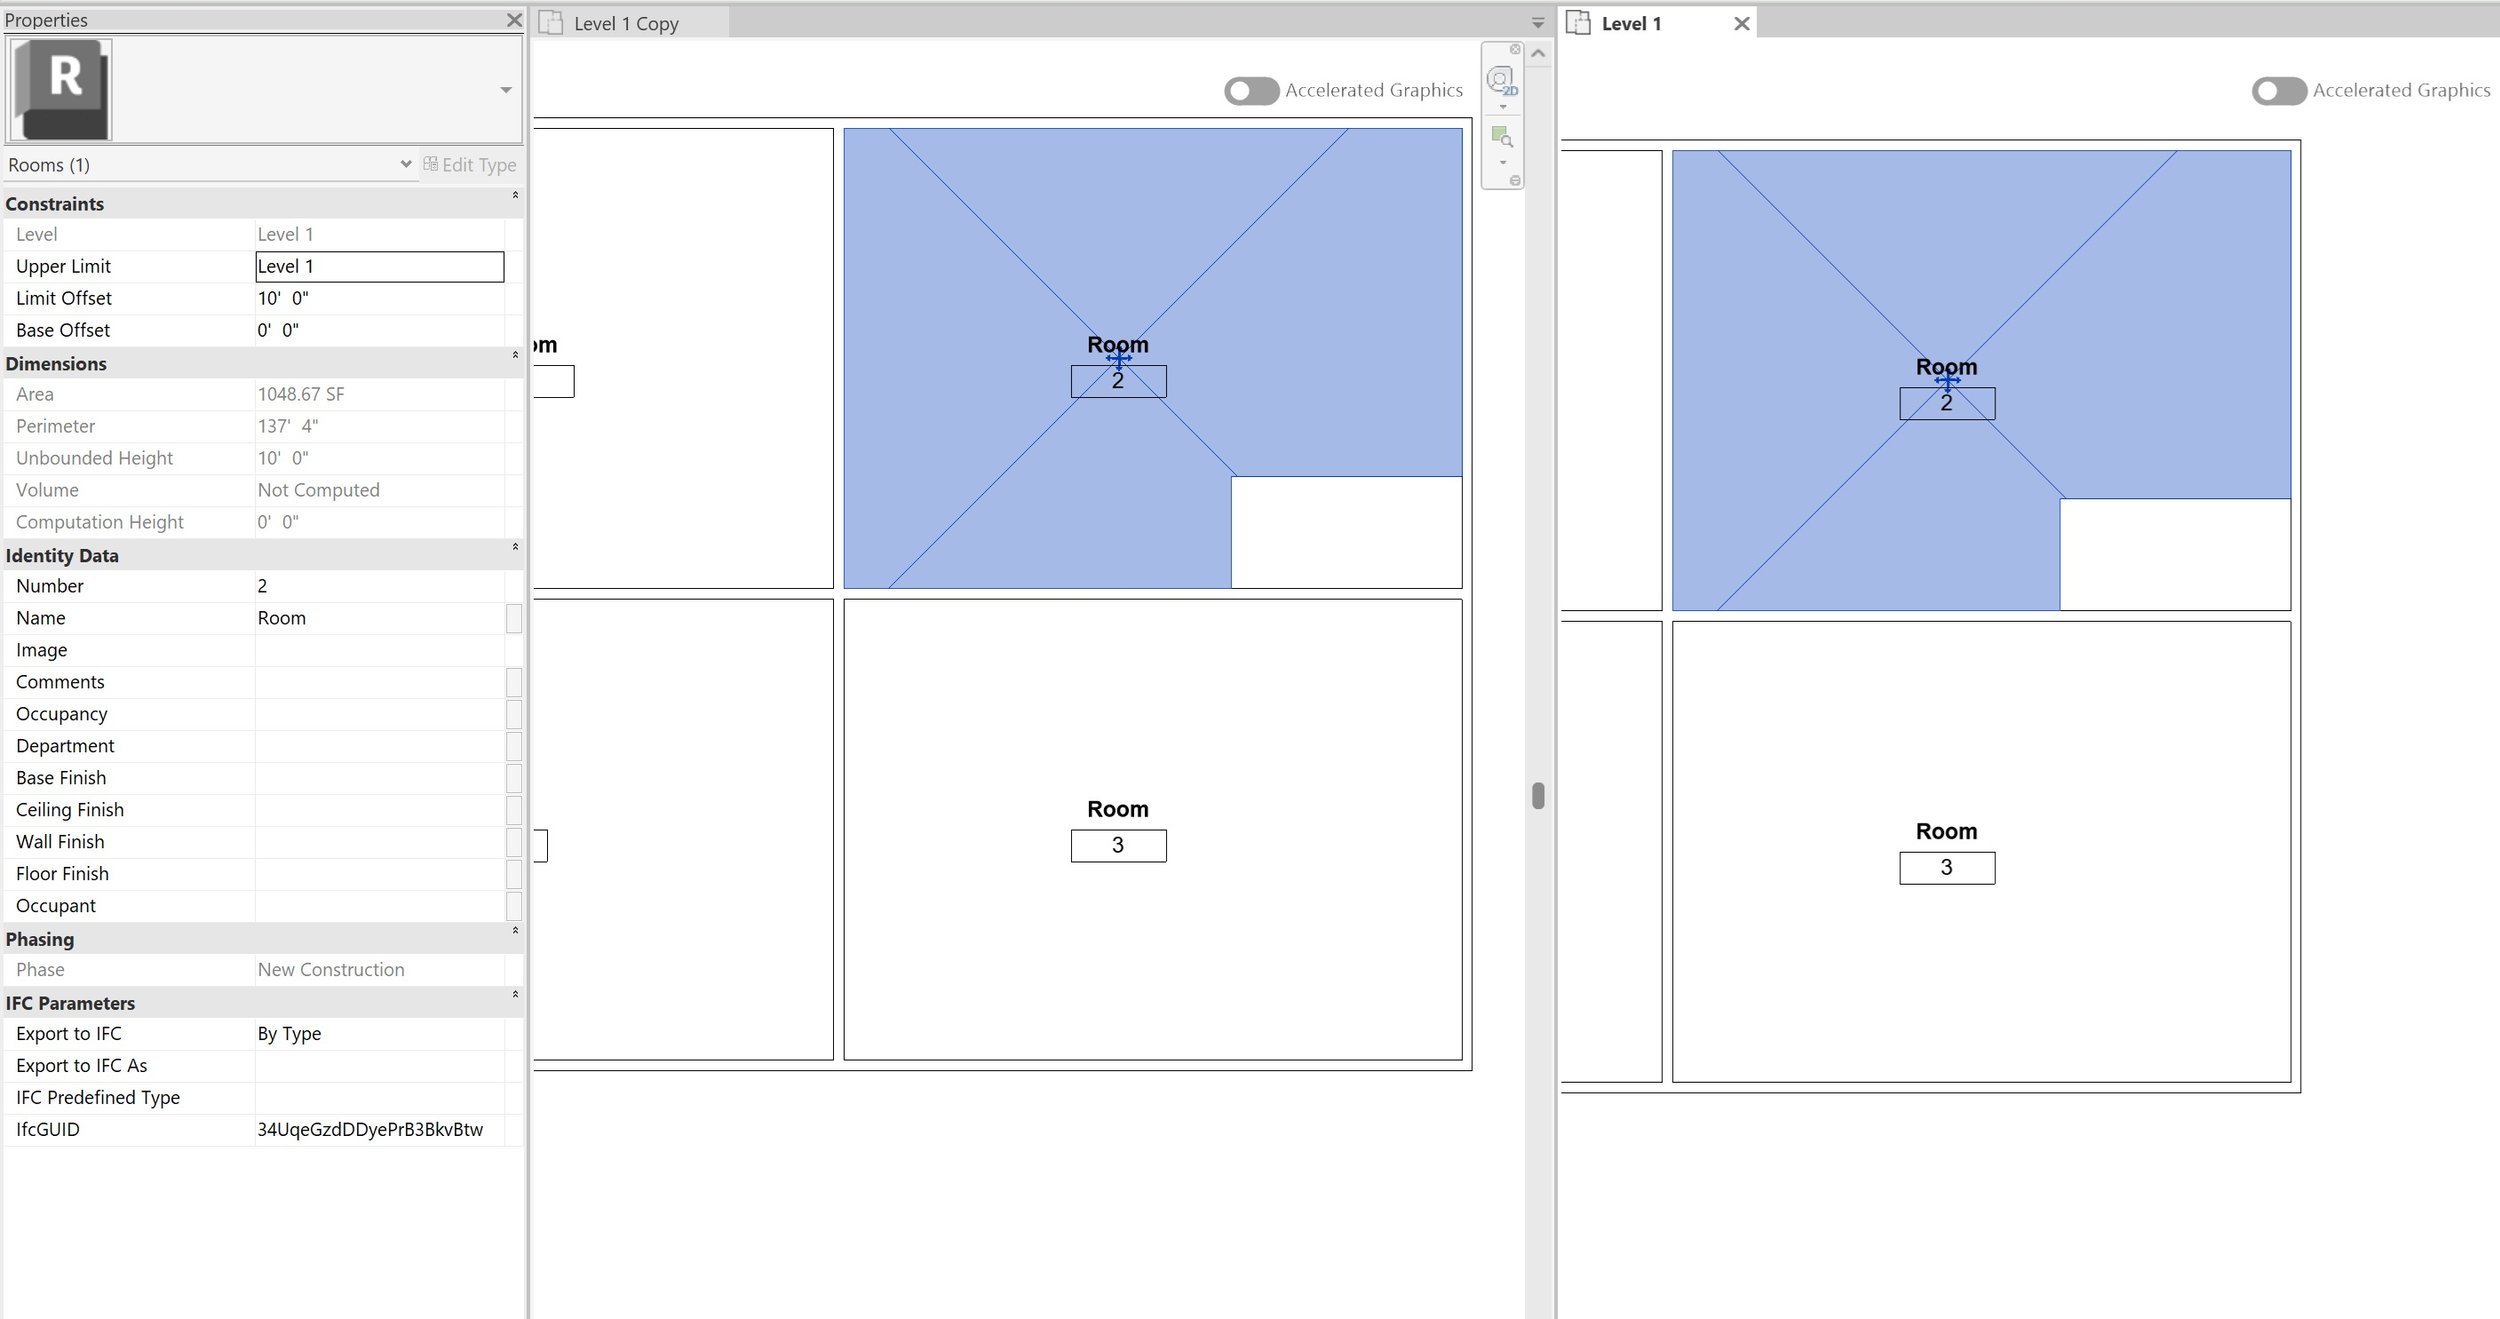
Rooms
This method is more parametric across views and enables automated changes, are schedulable elements, but can only calculate the same area layout. Not great for projects that require multiple calculations with different area boundary requirements (occupant load, plumbing fixture, parking, building footprint, etc..) because if you modify a room boundary in one plan it affects all plans.
Areas
These family elements are tied to specific view type, are schedulable elements, and can calculate different areas without affecting area calculations on different area schemes, however unlike rooms, where they can automatically draw boundaries from walls, users have to manually assign boundary lines.
We firmly believe that areas should be used solely for code calculations because a single project can contain multiple calculations that do not affect the other. Rooms are still useful for other documentation requirements but should not be used for area based calculations.
Creating area schemes
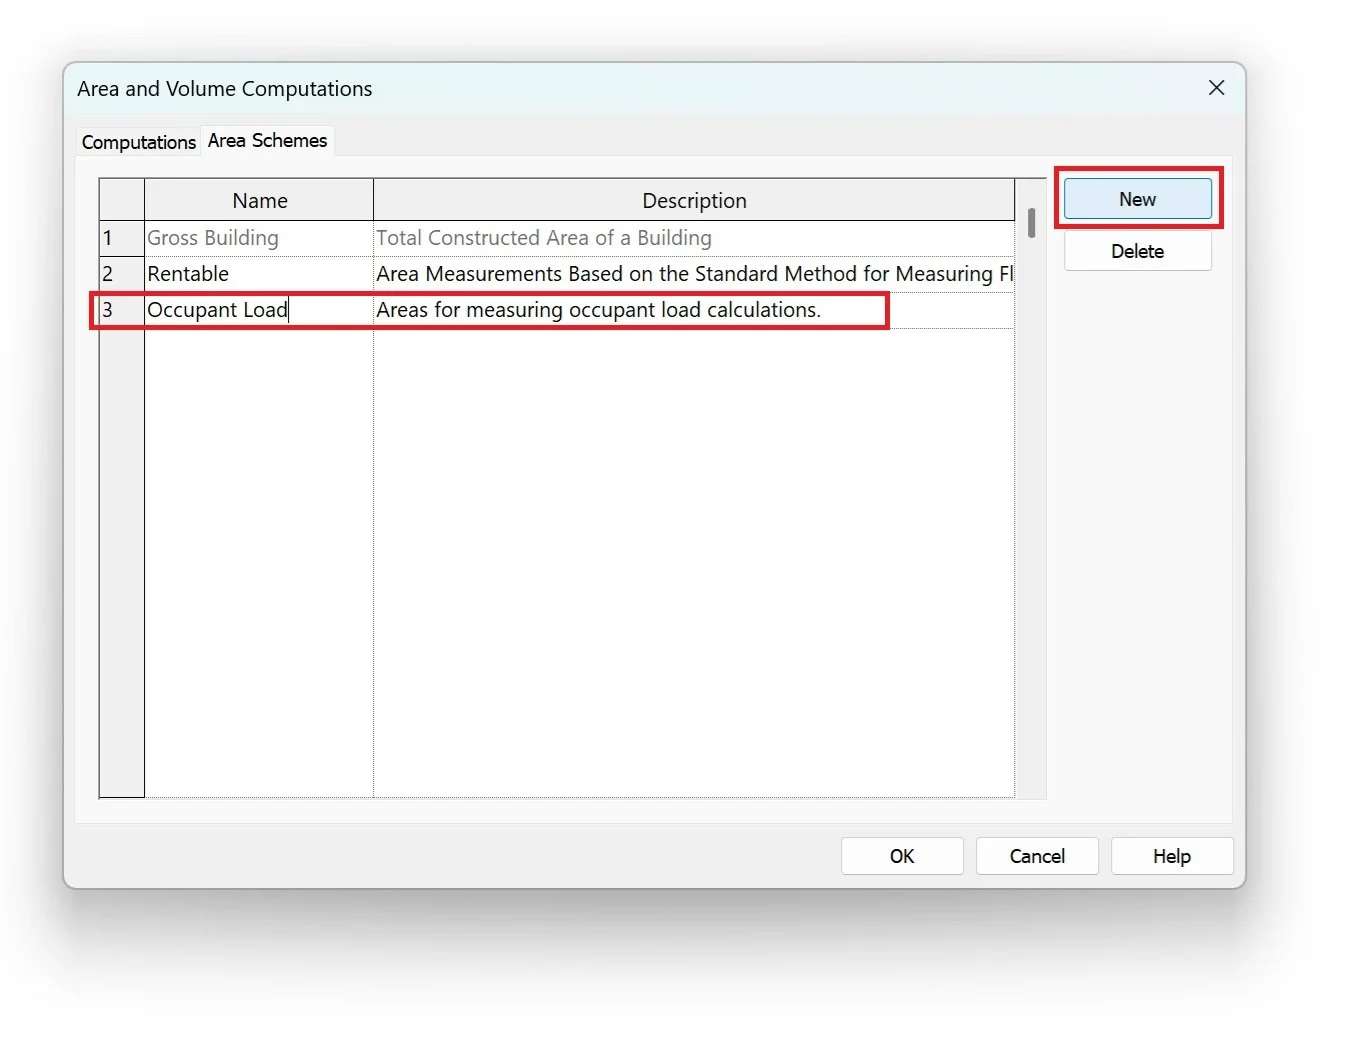
To set up an area plan in Revit we first need to create an area scheme. To create an area scheme navigate to:
Architecture > Room & Area > drop down arrow > Area & Volume Computations
Inside the dialog window click on the Area Schemes tab and press the New button. This creates a new scheme that will be used solely for occupant loads. Fill out the description so users can understand its purpose. Create as many as you need, such as BOMA calculations, plumbing fixture calculations, parking space calculations, etc...
Creating area plans
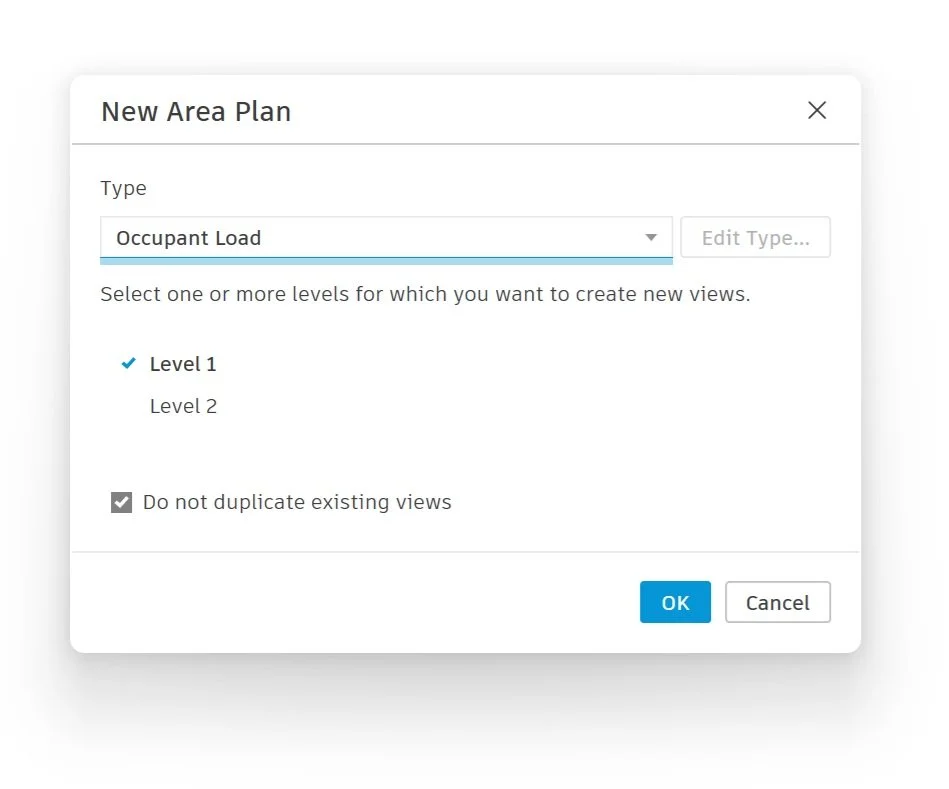
Now that we have an area scheme to calculate occupant loads we can generate the plans by navigating:
View > Plan Views > Area Plan > in the dialog under type, click on the occupant load scheme > select the views and press OK
Next we will need to add the area boundaries.
Architecture > Room & Area > Area Boundary
Revit will prompt users to automatically assign area boundaries to external walls. Typically, we perform this manually because we want to dictate how the areas are calculated and Revit can perform some funky assignments. Plus depending on the calculable areas, users will need to specify which part of the wall the calculation should be set: exterior, interior, or centered.
Lastly, we will assign each division with an area, tag, and rename as needed.

How to set up an area schedule
The next part requires us to set up schedules.From a single window we can see all areas and calculate values. The great thing about area schedules is they are assigned based on the area scheme so you are not having to create multiple schedules and filters just to get different subsets of information. Occupant area schedules and plumbing area schedules are completely separate.
This is done like creating a typical schedule:
View > Create > Schedules > Schedule/Quantities > Scroll down to select Areas (Occupant Load) schedule
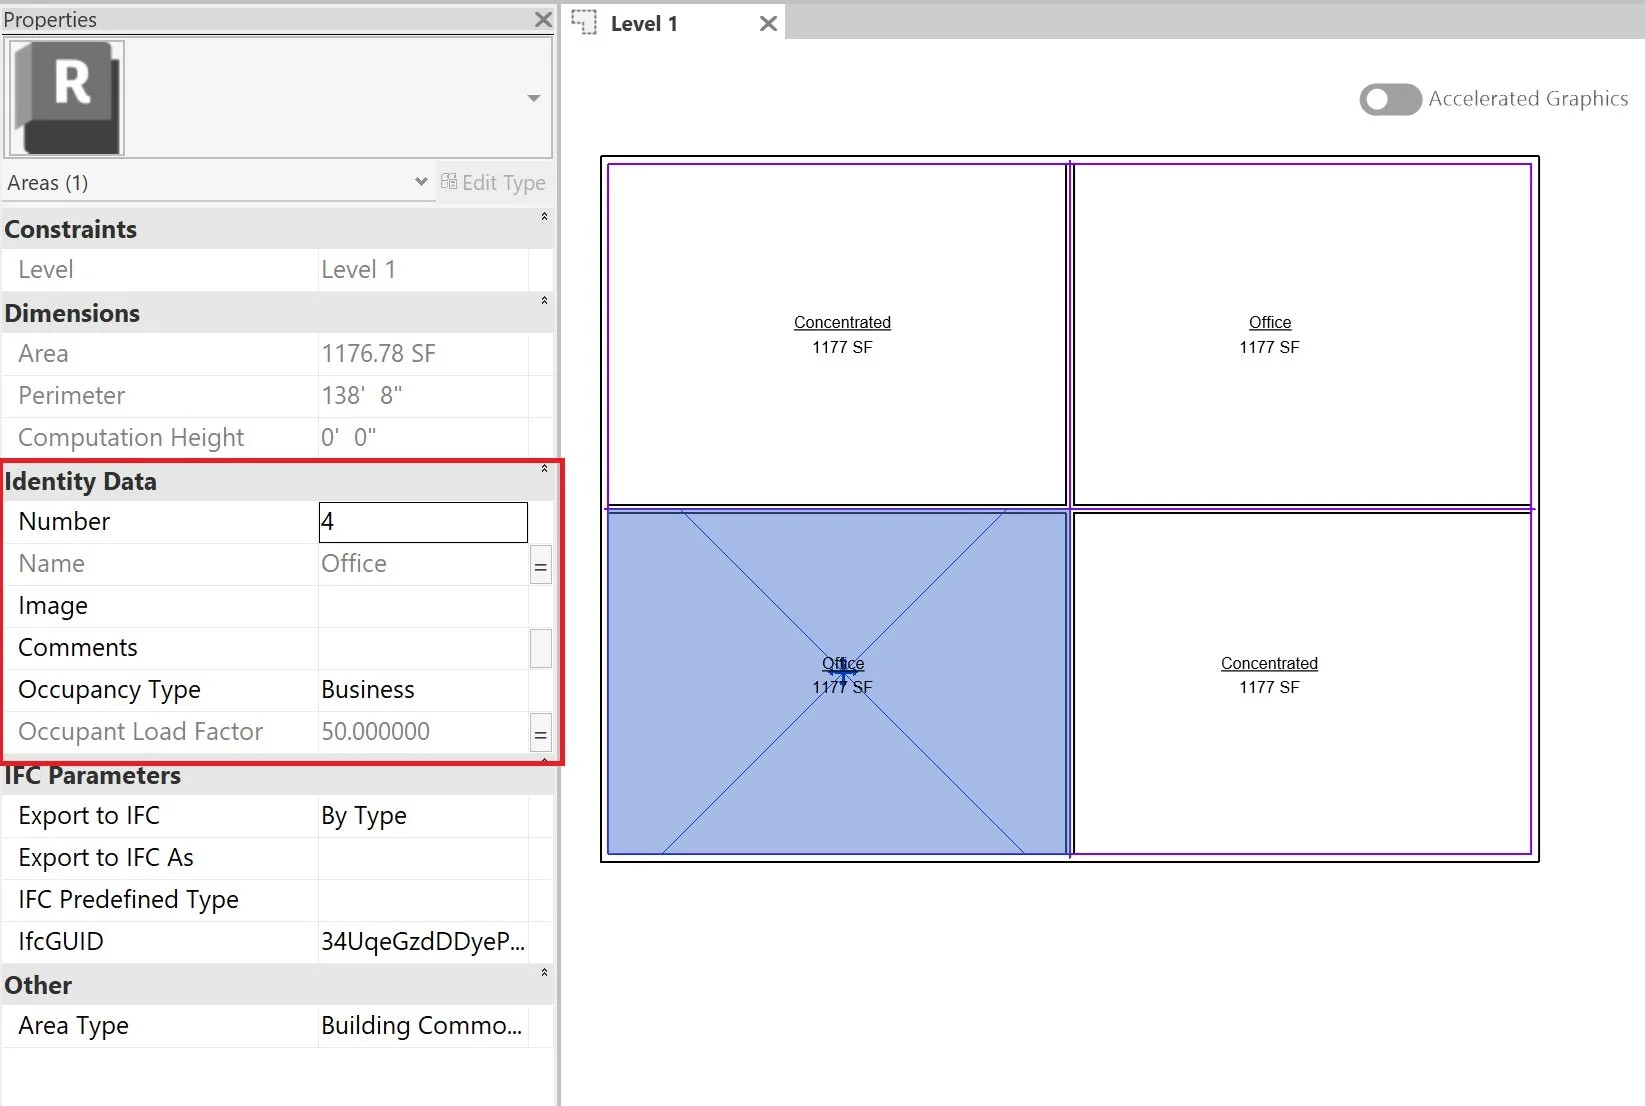
To the schedule add the name, number, and area parameters.
How to set up occupant load schedules in Revit
Next we are setting up the actual calculation for each area. This can be done two ways: manually setting the occupancy factor for each area or make use of key schedules to batch assign information. The manual option works well enough for simple calculations however it is not dynamically and requires users to update each area manually. We prefer using Key Schedules because they automatically populate large sets of information and is dynamically linked to a key, which means if the key needs to be revised all areas assigned that key will update accordingly instead of manually reviewing every entry for compliance.

We need to create the Occupant Load Factor parameter. Set this parameter as a number instead of an integer to avoid any Revit shenanigans. We will come back and set up the calculated value after set create the key schedule.
Setting up area key schedules
We previously wrote about different use cases for key schedules. One of them being occupancy calculations! Key schedules are a powerful tool to set up in a project template. It enables users to pre-populate information typically referenced in a project to cut down on repeated inputs. Empowering users to assign a single parameter and Revit will auto populate typical information assigned to that element. Our Ultimate Revit Template deeply integrates this workflow to speed up project production.
The other great thing about area key schedules is they are not tied to specific area scheme like regular area schedules. Key parameter data can be assigned to multiple schemes without having to manage multiple sets of data.
To set up a key schedule you perform the same process as creating a regular schedule except before you press OK, in the New Schedule dialog users select Schedule Key and set a key name. We used with Occupancy Type as the key parameter.

In the key schedule window we select the Occupant Load Factor parameter, since that was already created in the main schedule, and add the Name parameter to the schedule. This way we can assign a key to an area element and the Name and Occupant Load Factor will be assigned.
Next, add data rows to the key schedule under: Rows > Insert Data Rows
Set the area Name and Occupant Load Factor values.

Back in the main schedule, once a key is assigned to the area element all parameters set up in the key schedule will gray out the parameter in the properties palette when selecting the area element. This simply means its locked and users cannot change this value unless they unassign the key value.
How to create a calculated value in a Revit schedule
We want to create a calculated parameter that will take the Area and divide it by the Occupant Load Factor for us to get the final Occupant Load.
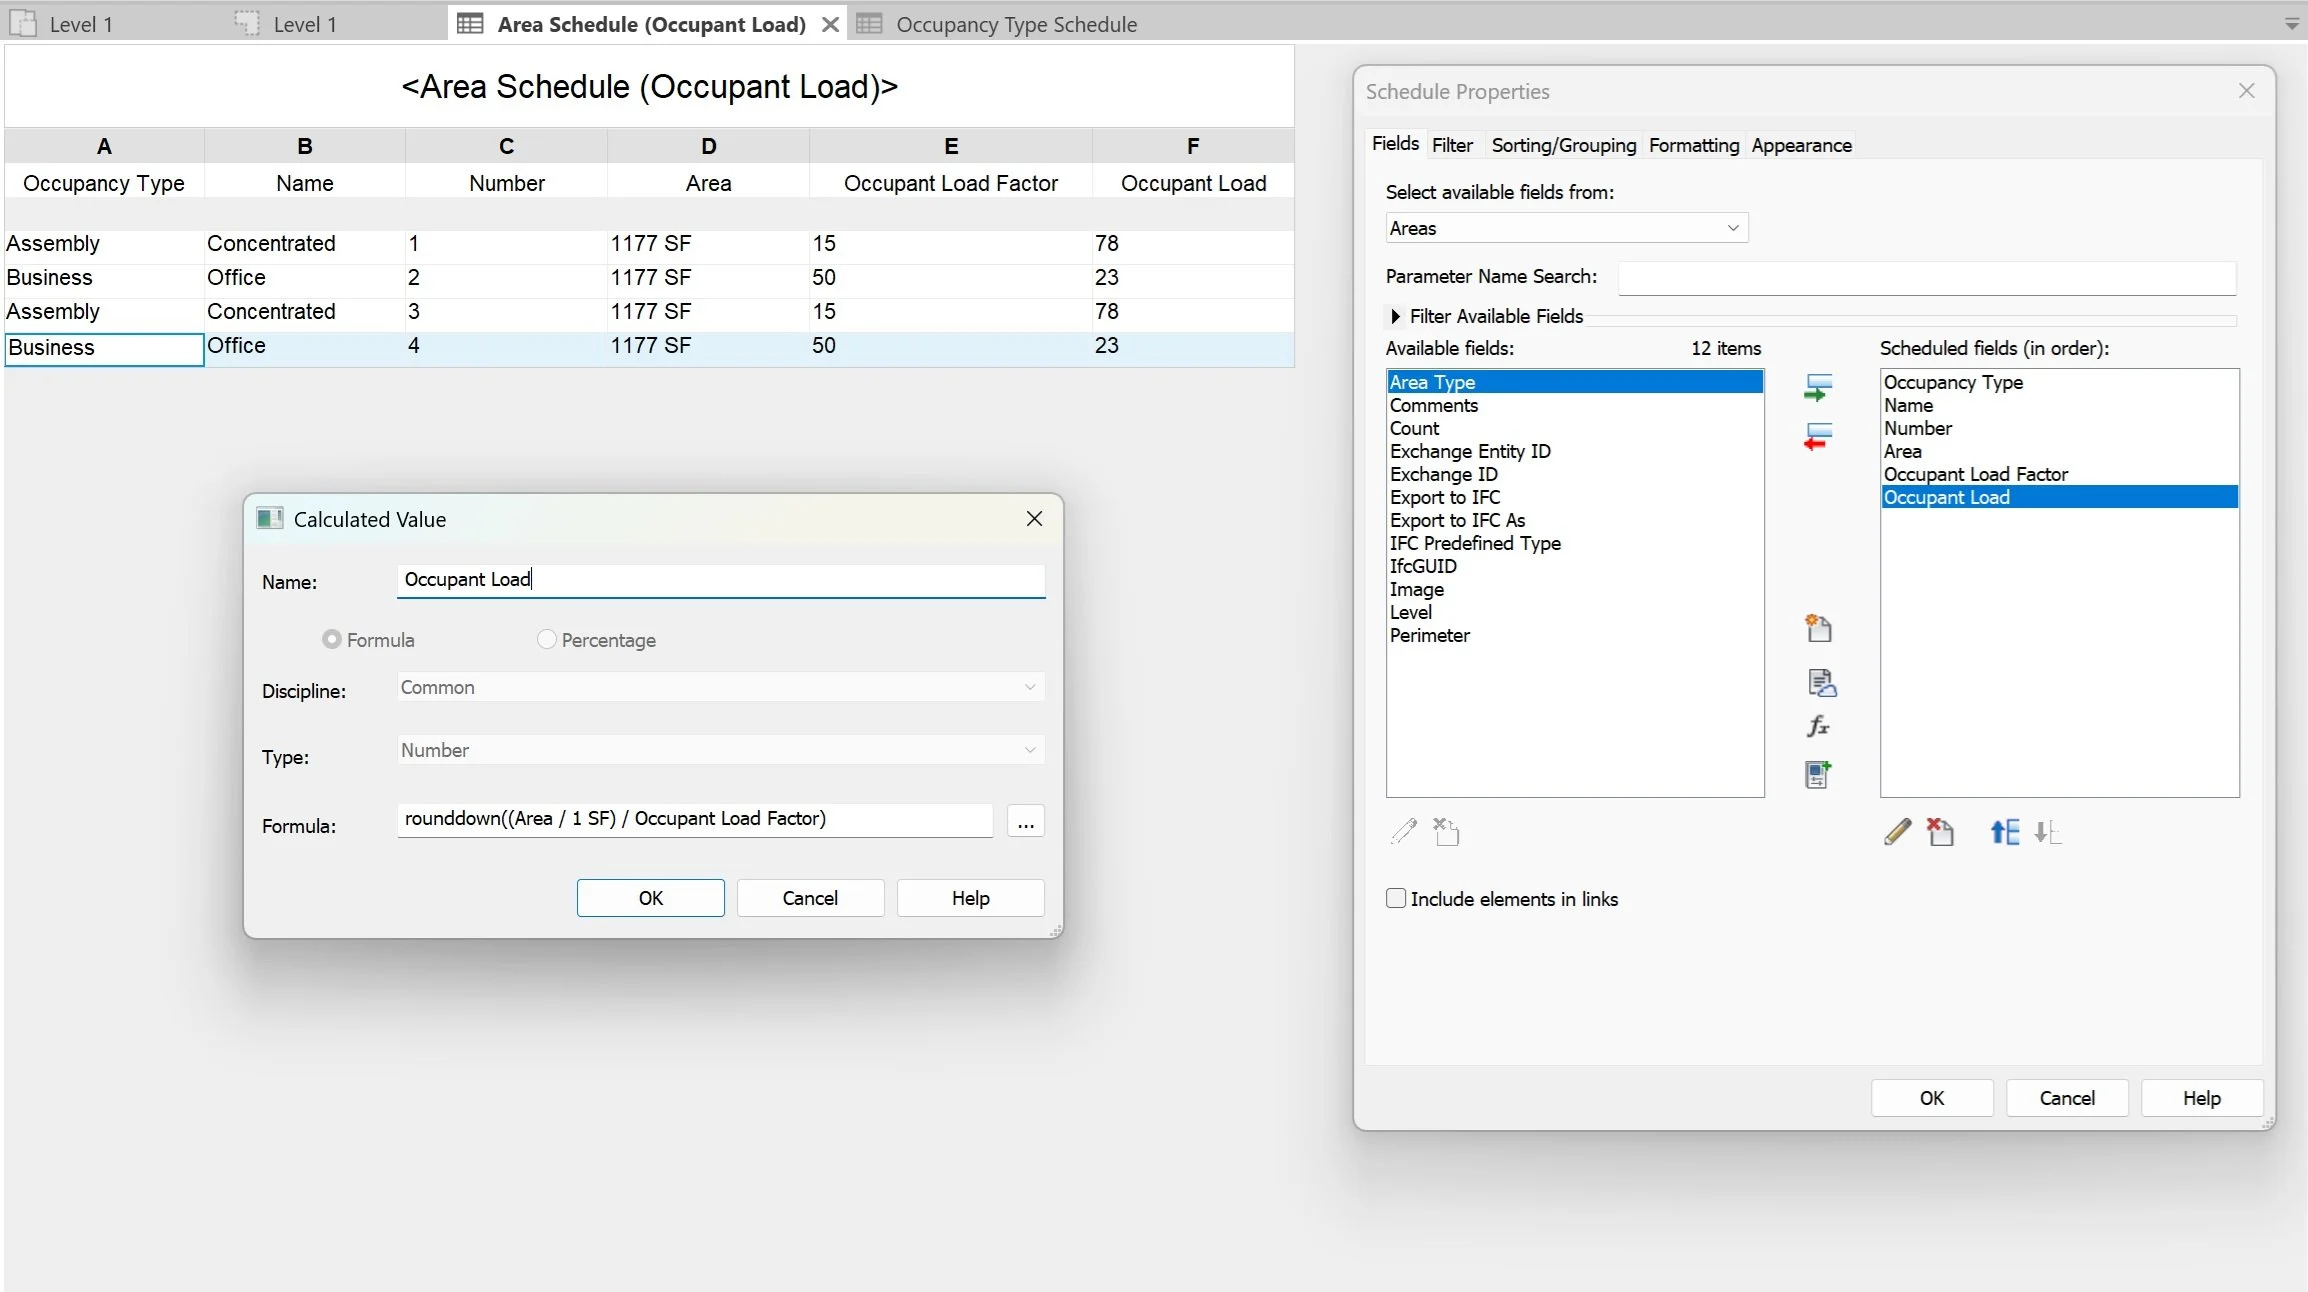
The occupant load should be set up as a number instead of an integer because we want to control, if and, how the rounding occurs. Input the formula below into the formula field.
(Area/1SF)/Occupant Load Factor
The area is rounded by 1SF to transform the area into a number and will output a decimal value. If you want to show a rounded number you can use the formulas below to specify how it should output values, then adjust the Field Format under the formatting tab.
Rounddown((Area/1SF)/Occupant Load Factor) or Roundup((Area/1SF)/Occupant Load Factor)
Our rule of thumb for these schedules is we round down occupancy since you cannot fit a whole extra person in a space if there is only a fraction of a person amount of space left and we round up for plumbing fixtures to accommodate enough occupants.
Things to consider when calculating parameters with units
Revit has this rounding quirk where it calculates numbers and unit based parameters differently. Number parameters are calculated to the highest precision but unit parameters such as Area or length are rounded for some reason and can lead to downstream inaccuracies. A good practice when creating schedules that use unit based parameters is to convert the value to a number parameter and then perform the calculation.
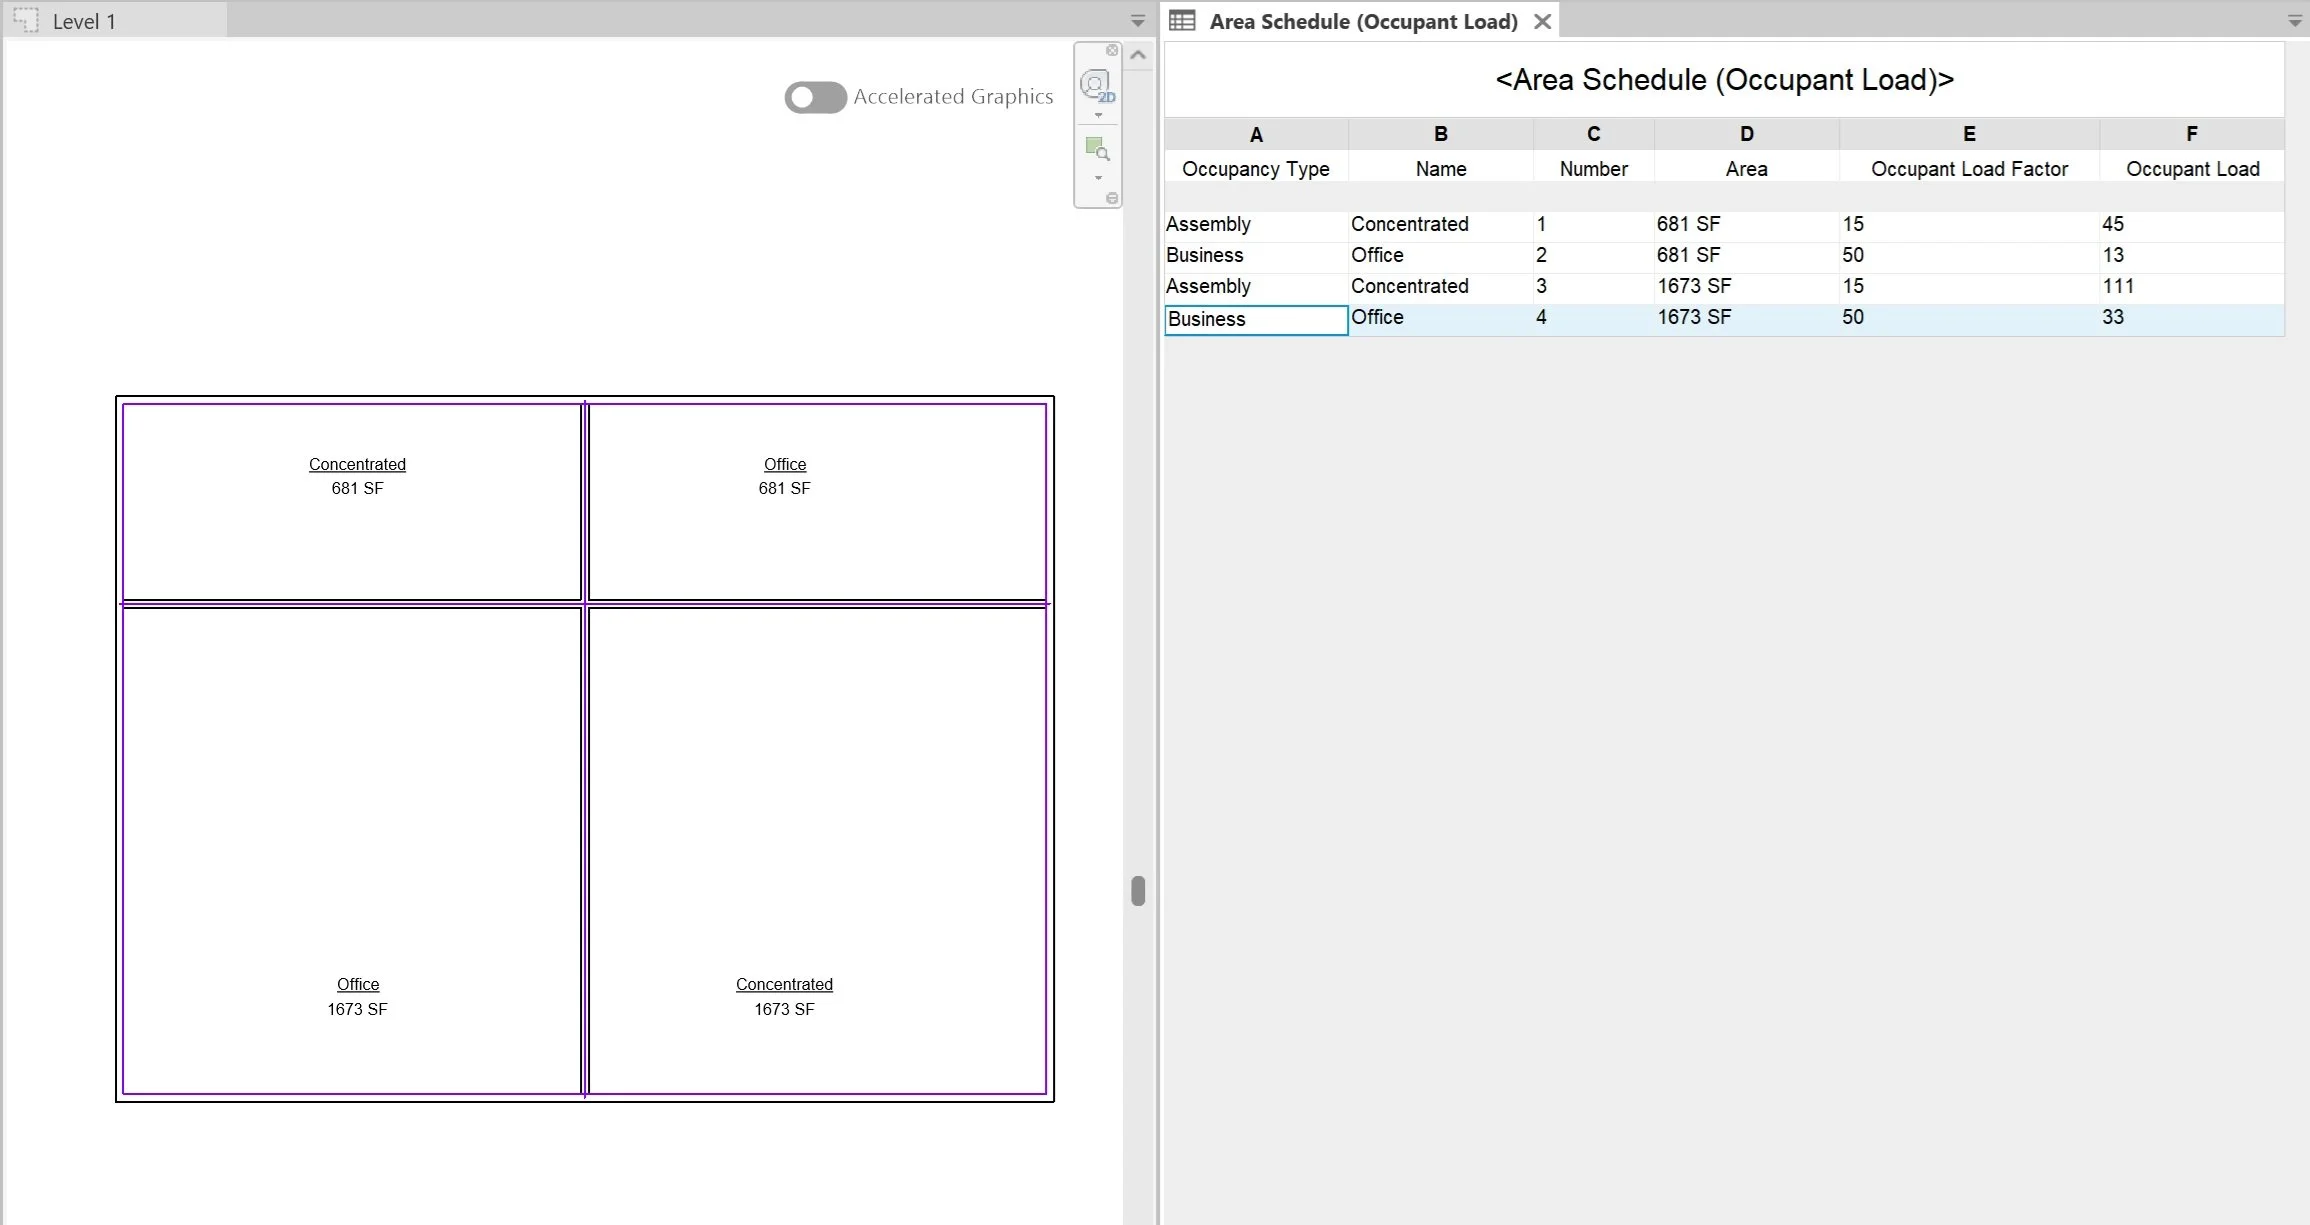
Adjusting areas in the model
Now that our schedule is set up we can mess with the layout in the plan and the values automatically adjust without having to start completely redo our whole calculation process.
Applying colors legends to occupant load plans
Revit enables users to create and coordinate color legends with keys. This means if you have areas that use the same occupant load factor Revit will color coordinate those areas. This feature also works with rooms but is helpful for diagramming area plans.
Navigate to: Architecture > Room & Area drop down > Color Schemes
Inside the Edit Color Scheme dialog users can manage existing and create new color schemes for rooms, areas, and spaces. Users can even manage multiple types of color schemes for each category by selecting different parameters for color grouping.

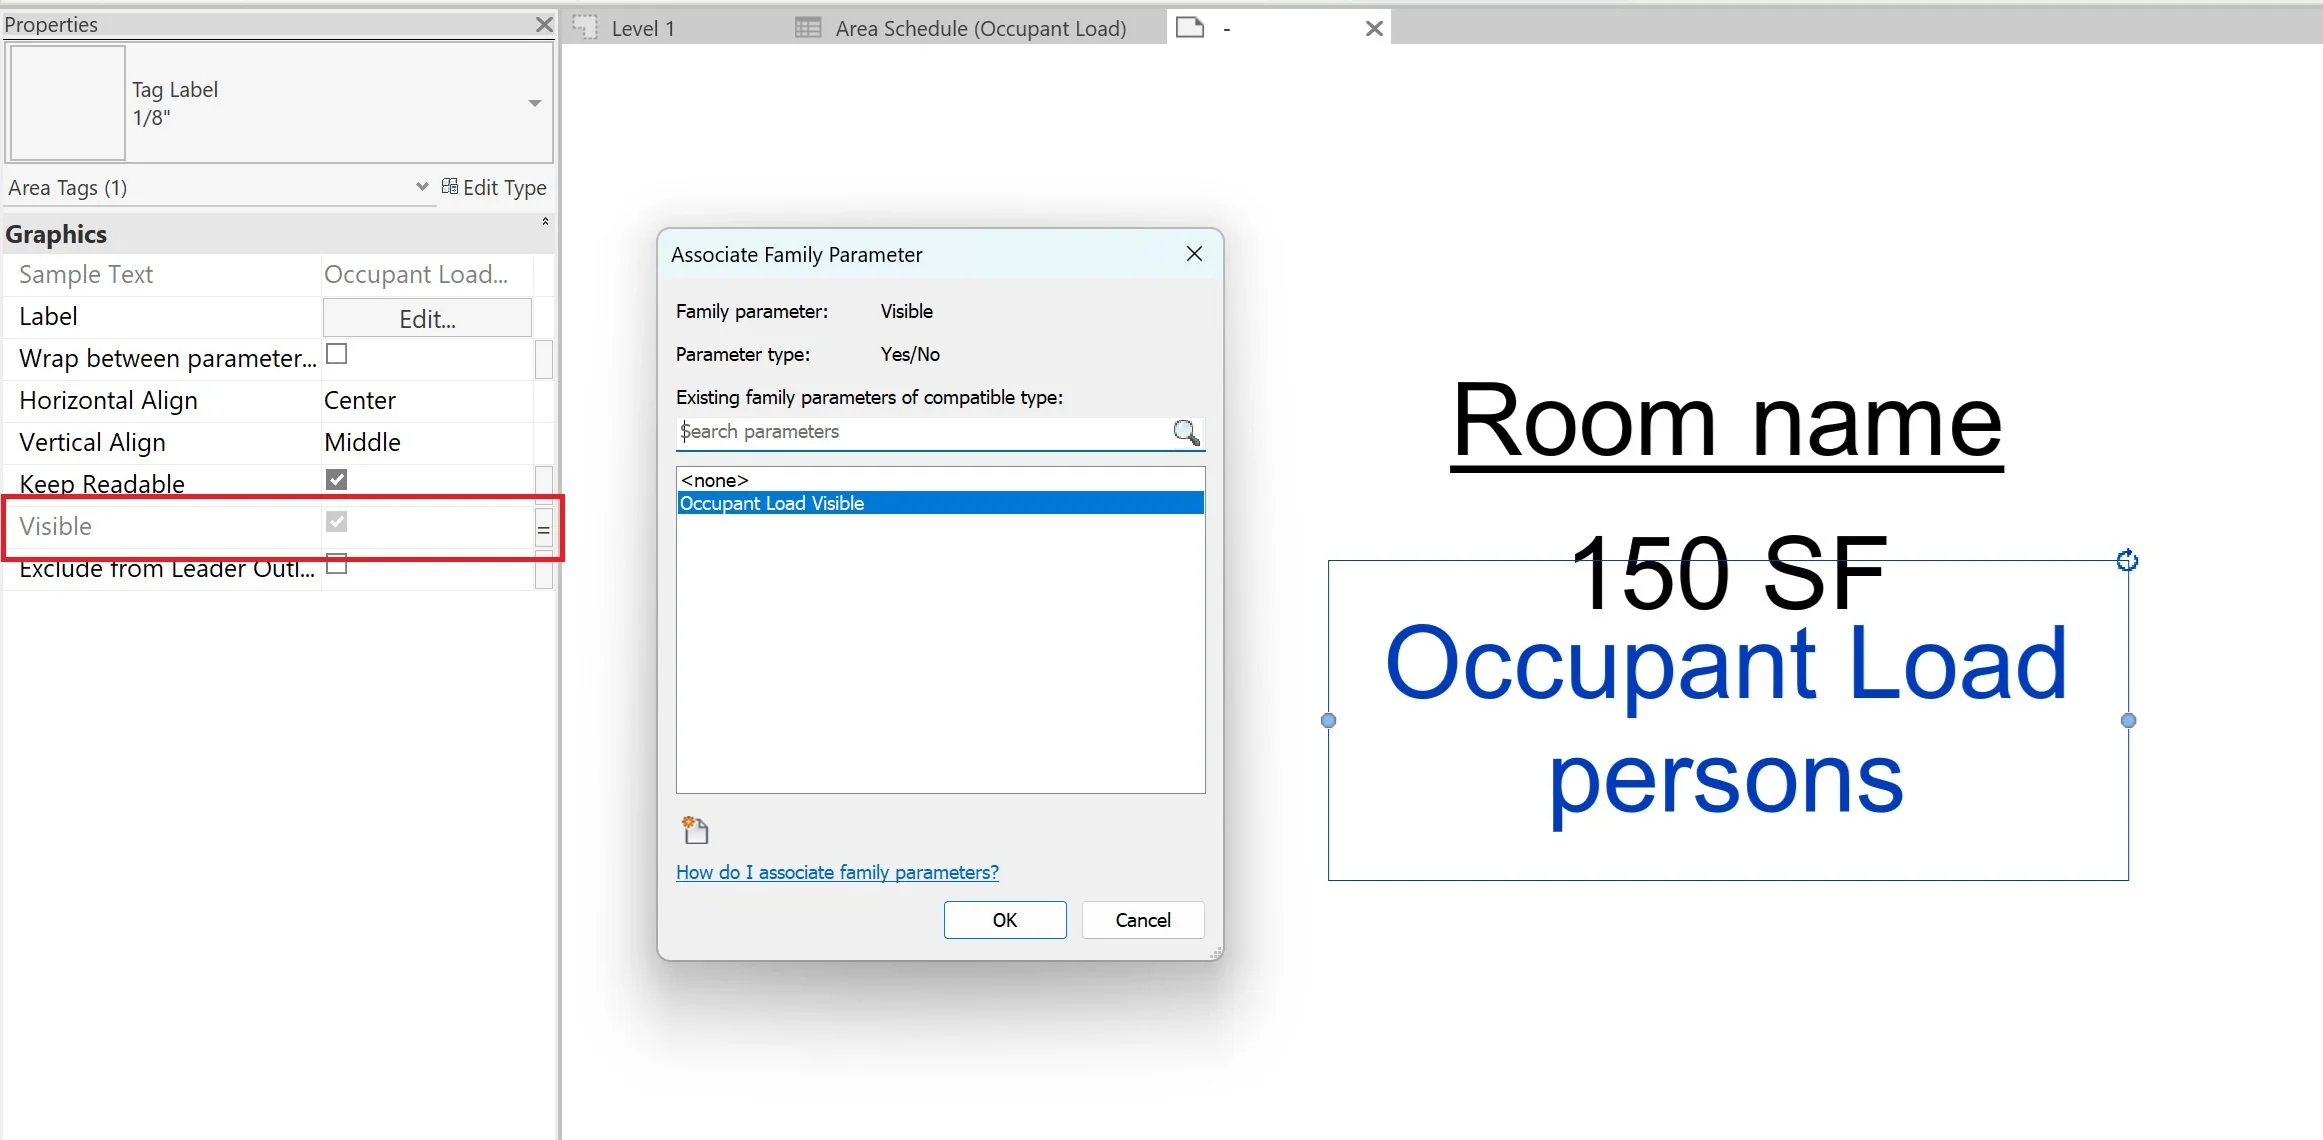
Create an occupant load area tag
To enhance occupant load diagrams we can create an area tag that will display the updated occupant load for each area. To create an occupant load tag we need to do a couple of things.
First, replace the Occupant Load Factor project parameter with a shared parameter. This can be done inside the area occupant load schedule or inside the project parameters dialog. Replacing with a shared parameter will enable the area tag family to link the values in the project to the tag.
Second, in the area tag, import the new Occupant Load Factor shared parameter into the area tag through the Edit Label dialog. Then create a new calculated parameter using the same formula we used inside of the project file. Then load the family back into the project file.
We can also add a visibility parameter to the label to toggle that specific label on/off without having to create a whole new family and is controllable through a type.
Adapting this system for better code analysis
Now that you have an idea for how this workflow structure is set up I am sure you are already thinking about how this could be used to check and validate other areas of the building code to automate calculations, like plumbing fixtures, parking counts, permeable pavement ratios, etc...
If you are interested in integrating this workflow into your project template, check out our Ultimate Revit Template. We put in the long hours to set up this system to be adaptable to all US code bases with minimal effort to swap out or add code base data. This way you can focus on designing projects instead of setting up formulas to validate code bases.

Streamline your design process with the Ultimate Revit Template, designed to leverage the full potential of BIM workflows for optimal project production and analysis. This comprehensive template features integrated code review workflows for key deliverables, enhanced view template filters for automated graphics, and advanced analytical tags to keep your projects on track. Benefit from detailed analysis schedules that provide precise requirements and identify major conflicts at every stage of project development.
BIM firms charge thousands for this level of development and integration; our template offers these powerful features at a fraction of the cost! We've embedded structures and automation to help reduce manual updates and avoid repetitive troubleshooting, allowing you to focus on bringing your projects to life efficiently. Experience a new level of productivity with the Ultimate Revit Template.
Have you used this method in your template? Do you have an alternative workflow that works better for your projects? Let us know in the comments! We would love to hear what you have set up.